This tutorial is addressed to DAZ’s PA’s or other content creators for DAZ Studio and you have to know some basic things about making wearable s for DAZ’s figures to follow up! This is a tutorial for advance level! In this tutorial I am gonna show you how to make symmetrical pJCMs for DAZ Studio, using ZBrush.
The idea wasn’t mine. I follow a workflow as Zev0 described it here in DAZ forums. I made some alterations as it makes it a little easier for me that way.
Lets say that you have a prop that fire up a JCM for the left side of a figure and you want to make the exact mirrored morph for the right side of the figure, when the corresponding right JCM is fired up. Can this could be done? Yes! Lets see the next examples and show you the necessary steps (you can find a video tutorial at the end of the article):
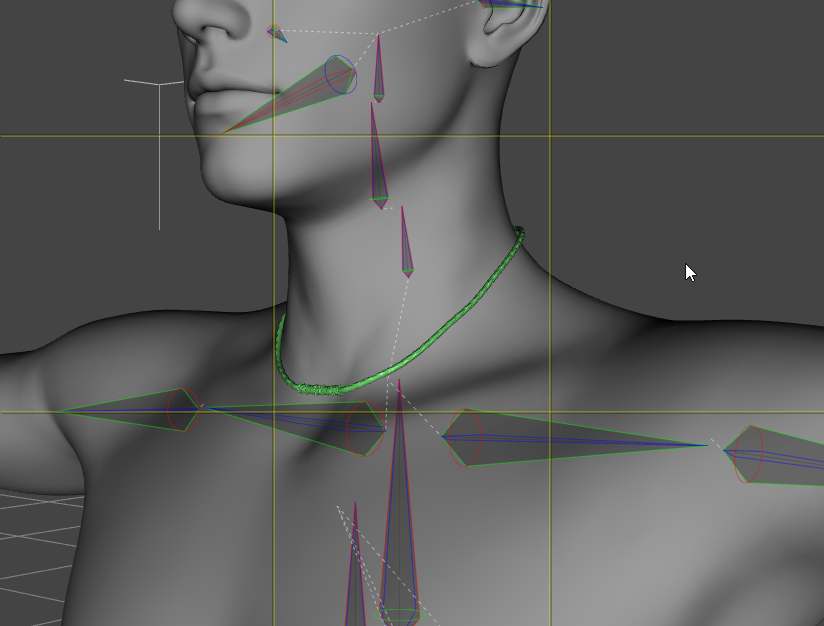
In my first example I am gonna use a necklace on a Genesis 3 Figure and I will show you how to make the two pJCMs that are needed for the left and right collar movement.
1. First of all we need to have the object (necklace) in the scene. (Menu/Import)
2. In this stage I am gonna use Transfer Utility (Edit/Figure/Transfer utility) to transfer the necessary rigging from the G3 figure to the figure.
3. If we are going to bend the Left Collar of the Genesis 3 at 50 degrees, the ‘pJCMCollarUp_50_L‘ will fired up and the necklace will be distorted. (If you don’t know how to see the JCM that is active, select the necklace in the scene menu, go to the Parameters Tab and select Hidden -you have to be in the edit mode-. The property that is at 100% with the gray letters is the pJCMCollarUp_50_L, if you check in the label). Copy the name of the JCM. We are going to need it.

4. Load another one time the object (necklace) in the scene, without any rigging. We are gonna use it as a starting point.
5. Transfer all 3 items (1 figure and 2 necklaces) to ZBrush. You can do it by using GoZ or just export them and re import them in ZBrush.
6. Now comes the tricky part. With the Test_Necklace_B_Original (our un-distorted object) selected we activate Store Target/MorphMT from the ZBrush side menu and the X Symmetry (hotkey x). You can check in the Transform menu for the active symmetry axis. In this stage I also activate Transp from the toolbox to make all other objects Transparent so I can work better and maybe hide the figure.
7. With the move brush I try to mach the original Object to the shape of the distorted object, for the left side. Of course the same changes will be done in the right side due to the X Symmetry activation.

8. Unhide the main figure and make the final adjustments.
9. Time to export our morphs. First of all hide all other sub-tools except the morphed object. Now have a front view (you can use shift while rotating the camera to ‘lock’ it to the front view). Now dis-activate symmetry (again hotkey x) and mask the left half part of the necklace (MaskRect is a good brush to use for this). With the necklace half masked, go to the Morph Target menu of ZBrush and slide the Morph property all the way to the right. As we activated the Morph Target at the beginning of the process, it still remembers the initial state of the necklace and now it applies it to the unmask (right side) of the object. Now export the sub-tool and save it with the JCM’s name ‘pJCMCollarUp_50_L‘.

10. Now undo the last action with Ctrl-z. It will bring the necklace to the totally morphed state. Invert the mask (you can Ctrl and left click to any empty space of the scene). Now the right side of the object must be masked. Use again the Morph Target/Morph slider all the way to the right. Now the object has maintained its right side morphed. Export it as pJCMCollarUp_50_R.

11. Now back to the DAZ Studio. To apply correctly the morphed objects as JCMs the figure must have the same pose as when we exported the necklace to ZBrush. This mean that the left morph must apply when the figure has the left collar at max angle (50) but no other pose in any other body part, and the right morph must apply accordingly when the right collar is at 50, but no other body part has any pose. Lets go for the left side. If the figure is at the same state as we left it, it must have its left collar at 50. Select the rigged necklace (you can delete the other one now). Now, open the Morph Loader Pro (menu Edit/Figure) and:
‘Choose as morph files’: the pJCMCollarUp_50_L.obj file that we exported from ZBrush. The name of the file is the same as the JCM so there is no need to change the name in the morpher.
For ZBrush use: modo scale (1 unit = 1m).
Select Reserve Deformation: Yes, by right click in this window
Preserve existing deltas: Yes (it is Yes by default). You can find it by clicking on the little arrow in the reverse deformation section
Overwrite existing: Deltas Only (right click to show you the options)
Press accept and we are ready for the left side.

12. Reset the figure and then bend the right Collar at -50. Select again the object and repeat step 11 for the right side by choosing pJCMCollarUp_50_R.obj file.

Don’t forget to save the object as an asset (F4) to keep the JCMs.
With this method you have 2 perfectly symmetrical JCMs with one transformation in ZBrush. The same technique can be applied for any other figure.
The question is, could this be done with two different meshes like gloves, shoes etc? I think yes, with a little variation. I have tried it for some sort of gloves (not real product, but just an exported mesh from the Genesis hands just for the test). I wont write again all the steps in details but only the differences.
1. The same
2. The same (just select gloves from the Projection Template)
3. The same but for the bend Left hand property of G3. At this point bend the Right hand as well.
4. The same.
5. Export the ‘bent’ gloves as an obj (modo scale) file. Transfer to ZBrush only the main figure and the original un-rigged gloves.
6. After activating the MorphMT in ZBrush having the original gloves selected as subtool Import (not Insert from the subtools menu but Import from the tool menu) the file that you save in step 5 with the bent gloves.
7. The same
8. The same
9. The same (pJCMHandDwn_70_L is the name of the JCM for the left side. Name the file that way)
10. The same (pJCMHandDwn_70_R is the name of the JCM for the right hand. Name the file that way)
11. Back to studio. Reset the figure posing. You can delete the un-rigged gloves as well. Bend the left hand at-70 and apply the pJCMHandDwn_70_L.obj as a morph target.
12. Reset the figure and bend the right hand at 70. Apply the pJCMHandDwn_70_R.obj as a morph target.
Done!
Watch a video tutorial of this method:
I haven’t test it for other body parts but it should work.
Sorry for any linguistic mistake as English is not my native language!
Have fun!